Einführung in die Radiologie des kindlichen Skeletts
Prinzipielles
Kinderradiologie macht Spass. Besonders dann, wenn wir uns auf einfache, systematische und unterhaltsame Art für Prüfungen und - besser noch - für den klinischen Alltag fit machen können.
Wir haben hier einen "Hometrainer" hergestellt, dessen Grundcharakter lehrbuchartig ist; allerdings mehr im Sinne eines Bilderbuches als eines Textbuches. Hier soll das Sehen geübt werden und das Besondere in der Vielfalt erkennbar werden.
Wir hoffen, dass alle mit dem gleichen Sportgeist in die Materie springen, wie wir ihn beim Herstellen des Werkes entwickelt haben und zum Schluss sagen können "das hat Spass gemacht und ich fühle mich jetzt fit!".
Trainingsanleitung
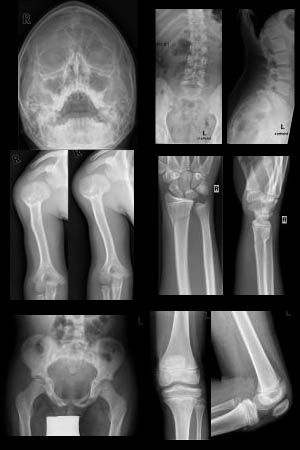
Normale Skelettentwicklung: Zunächst ist es sinnvoll, sich etwas mit dem Normalen und dessen Metamorphose, der Entwicklung vom Neugeborenen zum Herangewachsenen auseinander zu setzen.
Gliederung nach Körperregion / Pathologie / Alter: Danach kann man je nach Neigung oder Notwendigkeit wählen zwischen anatomischen Körperregionen und deren pathologischen Spektra oder pathologischen Entitäten und deren Manifestationen in verschiedenen Regionen. Dabei stossen wir in beiden Sortierungen auf die gleichen Fälle, eben nur anders gruppiert - und man wird feststellen, dass man einen Fall, ist er in eine andere Umgebung eingebettet, oft nicht sofort als "schon bekannt" wieder erkennt. Die Einteilung nach Altersgruppen fanden wir beim Erarbeiten des Stoffes besonders erhellend, da häufig klare Zuordnungen von Pathologien erkennbar sind. Von Quervergleichen sollte dabei reichlich Gebrauch gemacht werden!
Studentenmodul: Für einen möglichst schnellen Überblick z.B. vor dem Kinderradiologiekurs: Im Studentenmodul sind 20 Fälle von häufigen oder aus anderen Gründen wichtigen Krankheitsbildern zusammengestellt. Sie sind alle kurz kommentiert. Zusätzlich gibt es eine kurze Einführung zu den 4 Röntgendichten und zur Skelettenwicklung.
Quiz: Alle Fälle werden unsortiert und "roh" angeboten und erst nach Aufkeimen einer eigenen Meinung kann die Auflösung herangezogen werden. Die ultimative sportliche Herausforderung: der unbekannte Fall ist es, den man ja auch in Prüfungen "serviert" bekommt oder der einem im Klinikalltag die Pulsfrequenz heraufsetzt.
Technik und Strategie
Jeder Fall hat eine 4stellige Nummer. Diese sollte man sich gelegentlich notieren, wenn man später einmal zu diesem Fall zurückkehren möchte (z. B. via "Bildarchiv").
Fährt man mit der Maus über die farbigen Pfeile im Begleittext, werden diese auf dem Bild sichtbar (absichtlich NICHT in den Lupenvergrösserungen 1 oder dem Vollbild).
Lupen und Vollbild (übrigens: Klick auf das Vollbild schliesst dieses bequem.) sind ein "Must", ohne sie sind die wichtigen Details unsichtbar. Damit vermeidet man den Frust, den man beim Betrachten vieler anderer bildbasierter Datenbanken auf dem WWW bekommt.
Hinweis:
In diesem Lernprogramm finden Sie Hypertext-Links zu Seiten der freien Enzyklopädie Wikipedia. In der Regel sind die Inhalte dieser Seiten von hoher Qualität. Beachten Sie aber den Discaimer von Wikipaedia.
Link-Empfehlung
- Childrens's Hospital, Cleveland Clinic
- PediatricRadiology.com
- RadiologyEducation.com
- Pediatric Imaging Online
- Yottalook
Buchempfehlung
- Praktische Skelettradiologie, Erich Voegeli, Huber Verlag
Introduction to the Radiology of Paediatric skeleton
In principle
Paediatric radiology is great fun. Particularly if we can prepare ourselves for examinations and clinical life in a systematic and pleasant way.
We put together a schoolbook like "home trainer" whose basic nature is the picture book not the textbook. Here you should train your observation skills and recognise the particular cases in a variety of examples.
We hope that everyone will have the same enthusiasm and the sportsmanship as we had while collecting and preparing this collection. We also hope that later you will say: "I liked it and I feel fit for my clinical life."
Introduction for training
Normal skeletal development: First of all it is reasonable to get familiar with the normal and its metamorphoses and the development of a newborn until a young adult.
Formation by region / pathology / age: Here you can select by your personal preference or necessity. In each formation you will find exactly the same cases but sorted differently. So you can for example choose an anatomic region and find its pathologic entities or an age group with its pathologic entities. You will recognise that a case seen in the aspect of different formations will not be recognised as the same case immediately. The formation by age: while working through these cases it is usually very illuminating because you'll see typical pathologies linked to those age groups. Comparisons should be used routinely.
Student module: Is meant for the fast overview e.g. before a paediatric radiology lesson. In this module you'll find especially selected 20 cases by their frequency or other special reasons. They all have short comments. Additionally there is a short introduction in those 5 radiologic densities and skeletal development.
Quiz: All cases are presented unsorted and "uncooked" only after you offer your view you will be able to see the right solution. The ultimate sporting challenge: The unknown case presented in the examination or in clinical life elevating your pulse rate.
Technique and strategies
Each case has its own four digit number. This number should be noted if you would like to see this case later again (via image archive).
If you cross those coloured arrows in the accompanying text with your "mouse" these arrows will emerge in the exposure instantly. But with intent NOT in the "full resolution" or "loupe" .
Magnifying loupe and full resolution are a "have to". Otherwise all those important details cannot be seen which is often very frustrating in other internet based teaching programs. A click at a "full resolution" picture will set it back to normal mode.
Note:
You'll find hyperlinks to other websites in this teaching program like free wikipedia. Usually those texts have a high standard but check their disclaimer to know their origin.
Recommendations